How to Make a Fortune Teller
How to Make a Fortune Teller in 7 Easy Steps
Introduction:
Have you ever wondered about the secrets behind creating a captivating fortune teller? If you're eager to delve into the mystical world of divination and want to learn how to make a fortune teller, you're in the right place! In this step-by-step guide, we'll walk you through the process of crafting your very own fortune teller, bringing a touch of enchantment to your world.Step 1: Gather Your Materials
To start your journey into fortune telling, the first step is to gather the necessary materials. You'll need a square piece of paper, markers or pens, and a clear mind ready to explore the mystical possibilities.Step 2: Fold the Paper Fortune Teller
Take your square paper and begin folding it strategically. Follow the folding instructions carefully to ensure the foundation of your fortune teller is solid. How to make a fortune teller begins with the precise art of paper folding.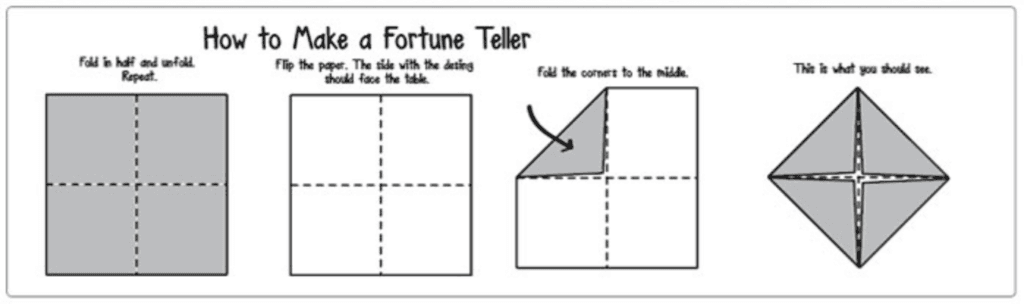
Step 3: Add Color and Symbols
Enhance the visual appeal of your fortune teller by adding vibrant colors and intriguing symbols. Incorporate elements that resonate with your personal mystic style, making your creation uniquely yours.
Step 4: Write Your Fortunes Fortune Teller
This step is where the magic truly happens. Channel your inner oracle and infuse the fortune teller with cryptic messages and intriguing predictions. The key to how to make an origami fortune teller lies in crafting fortunes that captivate and mystify.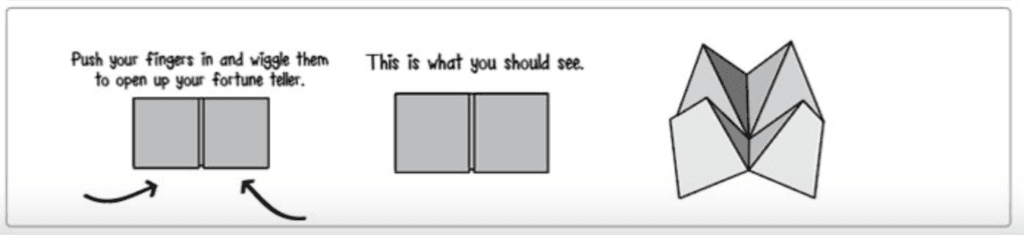
Step 5: Number the Sections
To create a seamless and organized experience, number the sections of your fortune teller. This not only adds a professional touch but also ensures a smooth flow during the divination process.Step 6: Practice Your Technique Fortune Teller
Before revealing your creation to the world, take some time to practice your fortune-telling technique. Familiarize yourself with the folds, symbols, and fortunes to confidently guide those seeking answers to their burning questions.Step 7: Share the Magic Fortune Teller
Now that you've mastered how to make a fortune teller, it's time to share your mystical creation with others. Whether it's at social gatherings, parties, or with friends, let the enchantment unfold as you guide curious minds through the captivating world of fortune telling.Conclusion:
Congratulations! You've unlocked the secrets of how to make a fortune teller in 7 easy steps. Embrace the mysticism, share the magic, and let your fortune teller become a gateway to a world of intrigue and wonder for those seeking a glimpse into their destiny. for How to make a Fortune Teller Videos. for other Origami Step by Step.Bonus:
Personalizing Your Fortune Teller for Maximum Impact
Now that you've mastered the fundamental steps of how to make an origami fortune teller, let's elevate your mystical creation to the next level with some bonus tips on personalization. Infusing your fortune teller with unique touches will not only enhance its visual appeal but also make the divination experience more memorable.Add Personal Touches
Consider incorporating personal elements into your fortune teller that reflect your individuality. Include symbols, colors, or themes that resonate with your interests or spiritual beliefs. This not only makes your fortune teller more authentic but also establishes a deeper connection between you and your creation.Integrate Astrological Signs
For an extra layer of cosmic mystique, incorporate astrological signs into your fortune teller. Assign each section a zodiac sign or use astrological symbols to create a personalized and celestial touch. This bonus tip adds an additional layer of intrigue for those seeking guidance based on their astrological profile.Amplify Visual Appeal
Enhance the visual appeal of your fortune teller by experimenting with artistic techniques. Consider using metallic pens, glitter, or even glow-in-the-dark elements to make your creation visually striking. A visually captivating fortune teller not only draws attention but also adds an element of enchantment to the divination experience.Craft Themed Fortune Tellers
Take personalization a step further by creating themed fortune tellers. Whether it's a love-themed fortune teller for romantic predictions or a career-themed one for professional insights, tailoring your creation to specific themes adds a fun and engaging dimension. This bonus tip ensures your fortune teller is not only a tool for divination but also a source of entertainment.Include Positive Affirmations
Infuse positivity into your fortune teller by incorporating uplifting affirmations. Alongside predictions, include encouraging messages that inspire and motivate. This bonus tip transforms your fortune teller into a powerful tool for personal growth and reflection.Share Customization Options
If you're creating fortune tellers for a group or event, consider providing customization options. Include extra symbols, colors, or pre-written fortunes that allow individuals to tailor the fortune teller to their preferences. This bonus tip adds an interactive element, making the divination experience more personal and engaging.Create a Fortune Teller Guide
As a final bonus tip, consider crafting a simple guide that explains the meanings behind symbols or provides additional insights into the divination process. This guide can accompany your fortune teller, ensuring that users have a seamless and enjoyable experience while uncovering the mysteries within. Incorporating these bonus tips into your fortune teller creation process will not only make your divination tool more captivating but also leave a lasting impression on those who seek guidance from its mystical depths. Embrace your creativity, personalize with intention, and let your fortune teller become a unique and cherished artifact in the realm of divination.
Level
—
Time
—
Paper
—