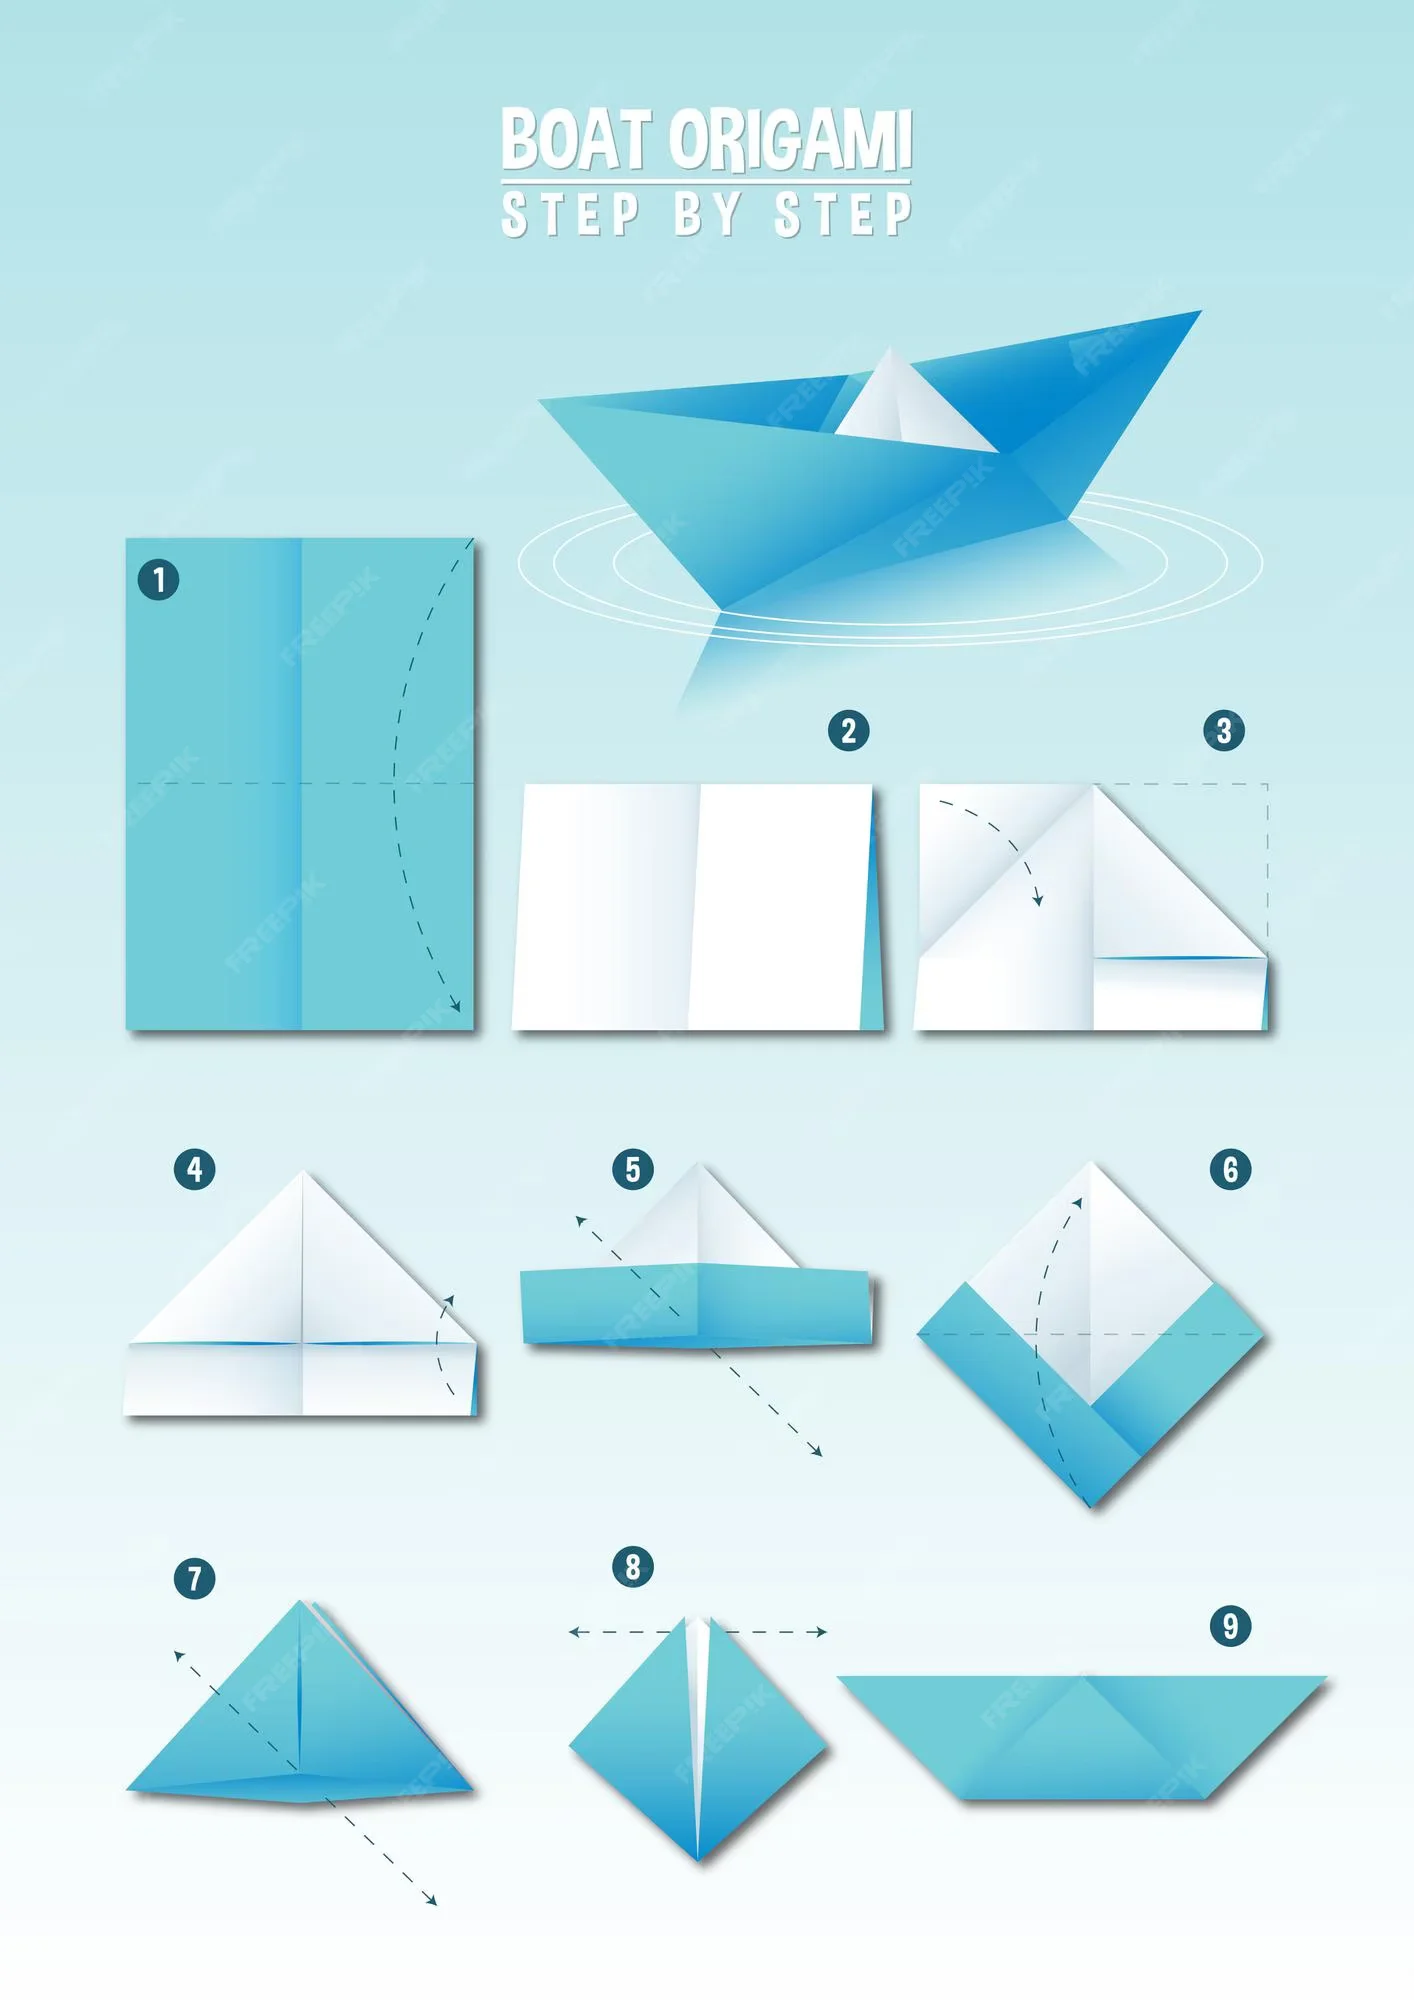
How to Make an Origami Sailboat (Easy Step-by-Step)
Learn how to fold an easy origami sailboat with clear, beginner-friendly steps. This is a great first project for kids, families, and classrooms, and it is fun for ocean themes and craft time. You need one square of paper—no glue and no cutting if you start with a clean square (trim printer paper to a square if needed).
Quick facts
- Difficulty: Easy
- Time: 5–10 minutes
- Paper: 1 square sheet
- Best for: beginners, kids (with help if needed), classrooms, and ocean-themed crafts
- Cutting / glue: not needed if you use square paper
Materials
- One square sheet of paper (kami, origami paper, or a trimmed square of printer paper)
- A flat, well-lit surface
- Optional: a ruler and a straight edge to cut a perfect square from a rectangle, plus a bone folder or your fingernail for sharp creases
Before you start
- Start with a true square—rectangles will not work evenly.
- Make every crease sharp so later folds line up.
- Line up edges and corners before you press the crease; small mistakes grow fast in origami.
- Fold slowly—this model is all about clean basics.
Step-by-step instructions
Step 1: Start with a square sheet
Begin with a single square, same length on all sides. If you only have a rectangle, measure once and cut a square before you fold (that is the only time scissors are needed for this project).
Step 2: Fold in half diagonally to make a triangle
Place the paper in front of you. Fold one corner to the opposite corner to form a large triangle. Press the long diagonal crease firmly, then open the paper back to a square.
Step 3: Open, then fold diagonally the other way
Now fold the other pair of opposite corners the same way. You will make a second diagonal crease that crosses the first. Press, then open the paper flat again.
Step 4: Open the paper and find the “X” crease
With the paper flat, you should see a big X meeting at the center. Those creases are your guides for the next two moves.
Step 5: Fold the paper in half “horizontally” (edge to edge)
Turn the paper so a flat side (not a corner) is on top. Bring the bottom edge up to the top edge and make a horizontal crease through the middle. Open the paper so you can still see the X and a new crease line that cuts across the square (a “+” and “X” pattern through the center, depending on how the paper is rotated). This extra middle guide helps the collapse sit evenly.
Step 6: Collapse along the creases into a triangle (double-layer base)
Hold the paper so the center of the X is in the middle. With a finger on the center, bring two opposite “sides” of the square in toward the middle. The model will “pop up” a little; keep guiding until you can flatten it into a tall triangle with a smooth front and back. You should end up with a double-layer triangle with a vertical crease up the center—this is a common starting point for a simple paper boat/ship shape. Press everything flat, especially the long vertical crease in the center.
Step 7: Fold the lower corners up to shape the boat
With the triangle’s point facing up and a flat bottom edge, work on the front (top) layer first. Take the left bottom point and fold it up and inward so it comes close to the top point of the triangle, following a line that keeps the model symmetrical. Repeat with the right bottom point so the two folds match. The front of your model will look like a smaller, tighter diamond/sail shape on top of the hull—that top triangle will read as a simple “sail” area, while the base becomes the boat bottom.
Step 8: Match the other side, then open and adjust the sail and hull
Turn the model over and repeat the same matching corner folds on the back so both sides are even. When both sides look the same, gently open the bottom of the shape so the “boat” can stand a little, then pinch the top point into a clean triangle for the sail and press the lower body into a stable hull that sits on the table without twisting.
Step 9: Flatten and sharpen the creases
Go over every fold with a fingernail or bone folder, working from the bottom of the boat up toward the sail. This helps the model hold its shape and look neat.
Step 10: Check the final sailboat shape
The finished model should be symmetrical from left to right when you look from the “front” of the ship. The base should be wide enough to rest on the table, and the upper fold should read as a small but clear sail. If one side is taller, re-open a fold and re-seat it, then re-crease.
Level
Easy
Time
10–15 min
Paper
15–20 cm square
Troubleshooting
- Sail does not stand evenly: Re-crease the center line and re-fold Step 6 so the triangle sits straight on a flat table.
- Boat looks uneven: Compare the left and right corner folds; undo the last few moves and re-align edges before re-creasing.
- Folds do not line up: Check that the paper is a perfect square and that the first two diagonals meet in the true center.
- Paper tears: Switch to slightly thinner paper, fold with less “force,” and re-open the fold to reduce stress on the point.
- Model too flat or too bulky: Gently re-open the bottom (hull) to add a little 3D shape, or press flatter to reduce bulk—small adjustments in Step 8 usually fix it.
Related tutorials
- Easy Origami (browse more easy projects)
- Easy Origami Step by Step (a guided order for new folders)
- How to make origami: a step-by-step guide (basics, folds, and good habits)
- More sea friends: origami crab, easy origami whale, and origami penguin
Materials
One square sheet. Lighter paper floats a little better for display.
Steps
-
1 Step 1: Start with a square sheet
Begin with a single square, same length on all sides. If you only have a rectangle, measure once and cut a square before you fold (that is the only time scissors are needed for this project).
-
2 Step 2: Fold in half diagonally to make a triangle
Place the paper in front of you. Fold one corner to the opposite corner to form a large triangle. Press the long diagonal crease firmly, then open the paper back to a square.
-
3 Step 3: Open, then fold diagonally the other way
Now fold the other pair of opposite corners the same way. You will make a second diagonal crease that crosses the first. Press, then open the paper flat again.
-
4 Step 4: Open the paper and find the “X” crease
With the paper flat, you should see a big X meeting at the center. Those creases are your guides for the next two moves.
-
5 Step 5: Fold the paper in half “horizontally” (edge to edge)
Turn the paper so a flat side (not a corner) is on top. Bring the bottom edge up to the top edge and make a horizontal crease through the middle. Open the paper so you can still see the X and a new crease line that cuts across the square (a “+” and “X” pattern through the center, depending on how the paper is rotated). This extra middle guide helps the collapse sit evenly.
-
6 Step 6: Collapse along the creases into a triangle (double-layer base)
Hold the paper so the center of the X is in the middle. With a finger on the center, bring two opposite “sides” of the square in toward the middle. The model will “pop up” a little; keep guiding until you can flatten it into a tall triangle with a smooth front and back. You should end up with a double-layer triangle with a vertical crease up the center—this is a common starting point for a simple paper boat/ship shape. Press everything flat, especially the long vertical crease in the center.
-
7 Step 7: Fold the lower corners up to shape the boat
With the triangle’s point facing up and a flat bottom edge, work on the front (top) layer first. Take the left bottom point and fold it up and inward so it comes close to the top point of the triangle, following a line that keeps the model symmetrical. Repeat with the right bottom point so the two folds match. The front of your model will look like a smaller, tighter diamond/sail shape on top of the hull—that top triangle will read as a simple “sail” area, while the base becomes the boat bottom.
-
8 Step 8: Match the other side, then open and adjust the sail and hull
Turn the model over and repeat the same matching corner folds on the back so both sides are even. When both sides look the same, gently open the bottom of the shape so the “boat” can stand a little, then pinch the top point into a clean triangle for the sail and press the lower body into a stable hull that sits on the table without twisting.
-
9 Step 9: Flatten and sharpen the creases
Go over every fold with a fingernail or bone folder, working from the bottom of the boat up toward the sail. This helps the model hold its shape and look neat.
-
10 Step 10: Check the final sailboat shape
The finished model should be symmetrical from left to right when you look from the “front” of the ship. The base should be wide enough to rest on the table, and the upper fold should read as a small but clear sail. If one side is taller, re-open a fold and re-seat it, then re-crease.
Troubleshooting
- Sail does not stand evenly: Re-crease the center line and re-fold Step 6 so the triangle sits straight on a flat table.
- Boat looks uneven: Compare the left and right corner folds; undo the last few moves and re-align edges before re-creasing.
- Folds do not line up: Check that the paper is a perfect square and that the first two diagonals meet in the true center.
- Paper tears: Switch to slightly thinner paper, fold with less “force,” and re-open the fold to reduce stress on the point.
- Model too flat or too bulky: Gently re-open the bottom (hull) to add a little 3D shape, or press flatter to reduce bulk—small adjustments in Step 8 usually fix it.
Related tutorials
- Easy Origami (browse more easy projects)
- Easy Origami Step by Step (a guided order for new folders)
- How to make origami: a step-by-step guide (basics, folds, and good habits)
- More sea friends: origami crab, easy origami whale, and origami penguin
Troubleshooting
If the hull will not stand, widen the base with a slightly rounder fold at the bottom.
FAQ
- Is an origami sailboat good for beginners?
Yes. It is mostly straight folds, careful alignment, and one collapse, so it is a great early project after you understand square paper and creasing.
- What paper should I use for an origami sailboat?
Thin, crisp paper works best. Origami paper (kami) is ideal; printer paper is fine if you cut it to a clean square first. Avoid very thick card stock for a first try.
- Can kids make this origami sailboat?
Yes—many kids can with adult help for the “collapse” step and sharp creases. In classrooms, pair students and do a slow demo first.
- How long does it take to fold?
Most first-time folders finish in 5–10 minutes once the paper is square. It can be faster on a second try.
- Can this paper sailboat float?
Sometimes, for a very short time, on calm water, if the paper is stiff enough and the folds are neat—but paper softens and may tear when wet. Treat floating as an optional, supervised experiment (and dry the paper after). For most people, the model is best as a display craft on a desk or shelf.